Titanium IPC || How to Set Up External IP Camera || Web Client
To access the web client, please use a Windows based PC and use Internet Explorer as the web browser.
Note: You will need to use the IP Tool (IPTool 2.0) to configure cameras that are on an external POE switch. With this tool, you will be able to scan the network for connected cameras, as well as modify the IP addresses for them.
The default information for Titanium cameras is as follows:
IP Address: 192.168.226.201
Subnet Mask: 255.255.255.0
Gateway: 192.168.226.1
Username: admin
Password: 123456
You will need the above information to modify the IP camera’s information to properly connect it to the NVR. This address may be modified through the IPTool directly.

Access the recorder’s web interface by typing in the IP address on the address bar of Internet Explorer. The path should look like the following: “http://xxx.xxx.xxx.xxx” (Note: If the HTTP port has been changed from default, you will need to add the port number after the ip address by inserting a colon “:” in between the address and port number).

Install all requested web plugins that are prompted by Internet Explorer. Once installed, you may need to refresh, or restart the web browser. You may install the plugin by selecting “Run”.

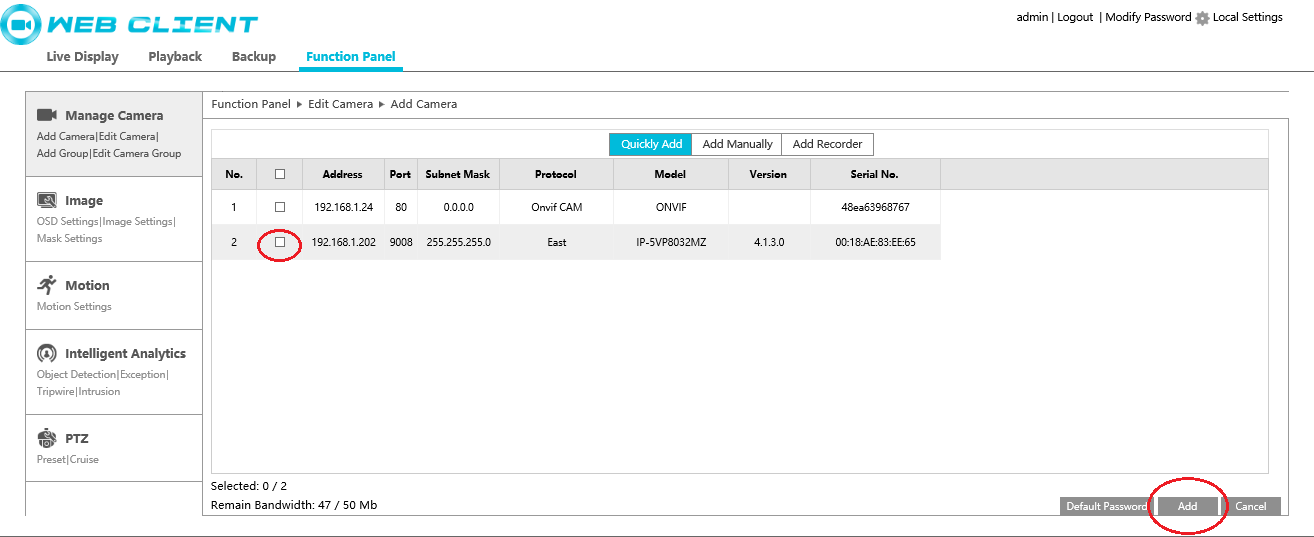
Select “Function Panel” on the main page after logging in. After selecting “Function Panel”, select the “Camera” option.

After selecting Camera, select Add Camera on the upper left hand corner of the page.

The system will try to detect any cameras connected to the same local network on the NVR. Titanium cameras, if still using the same default login information, will just need to be checked marked to add them, then select Add at the bottom of the screen.
Related Articles
ENS IPC || External 3rd Party IP Camera Initialization || Web Client
***Open SADP Tool (Downloadable from www.enssecurity.com Support->Download->Tools)*** Use the SADP Tool to set up the IP addresses for each camera respectively. Depending on the setup, Each IP camera will have the same IP scheme as the NVR’s internet ...Titanium IPC || How to Initialize an IP Camera || Web Client
To access the web client, please use a Windows based PC and use Internet Explorer as the web browser. Access the recorder’s web interface by typing in the IP address on the address bar of Internet Explorer. The path should look like the following: ...ENS IPC || IP Camera Initialization || Web Client
***Please Note: This process will ONLY work with ENS Series cameras*** To access the web client, please use a Windows based PC and use Internet Explorer as the web browser. Access the recorder’s web interface by typing in the IP address on the ...Titanium IPC || How to Set Up External IP Camera || Local GUI
***You will need a Windows based computer that is connected to the same physical network as the IP cameras to configure them with the necessary software*** Note: You will need to use the IP Tool (IPTool 2.0) to configure cameras that are on an ...ENS IPC || How to Default an IP Camera || Web Client
To access the web client, please use a Windows based PC and use Internet Explorer as the web browser. Access the camera’s web interface(you will need to be on the same network as the IP camera you are trying to access) by typing in the IP address on ...