ENS Recorder || Adding a Recorder to ENS Vision || Local GUI
***Note: You will need to download the ENS Vision app from the phone’s respective app store.***
During the initial setup of the recorder, you will have an option to set up the network to gain internet access and enable the P2P (Platform Access) function. First, make sure that the network is set correctly by either using DHCP to obtain an address automatically, or use a static IP address if provided by a network engineer.

After setting the network parameters, enable ENS Vision on the Platform Access page. This will take you to a popup window where you will need to create a verification code for authentication purposes. You will need to mark the check box before you are able to use the P2P services.


Once agreeing to the terms, you will be taken back to the Platform Access page. You will need to use the ENS Vision app to scan the QR code and register the recorder to a specific account. The account can be created on the ENS Vision app.

If the system has been initialized already, you may follow the steps below to get to the P2P function via menu. On the live view, move the mouse to the top center area and click the “arrow-like” button for the main menu access.

After selecting the Menu button, select System tab.

Then select the Network tab.

On the Network menu, confirm that the network settings under the TCP/IP page is correct to connect to the internet properly. After configuring the network, select the Advanced tab.

On the Advanced tab, select Platform Access.

If you’ve already enabled Platform Access during the system initialization process, you don’t need to do anything but double check the Status shows “Online” and ENS Vision Account shows “Linked” after system reboots.

If you don’t enable Platform Access during the system initialization process and wish to enable the P2P connection now, you may follow step 4~8 first. After setting the network parameters, enable ENS Vision on the Platform Access page. This will take you to a popup window where you will need to create a verification code for authentication purposes. You will need to mark the check box before you are able to use the P2P services.

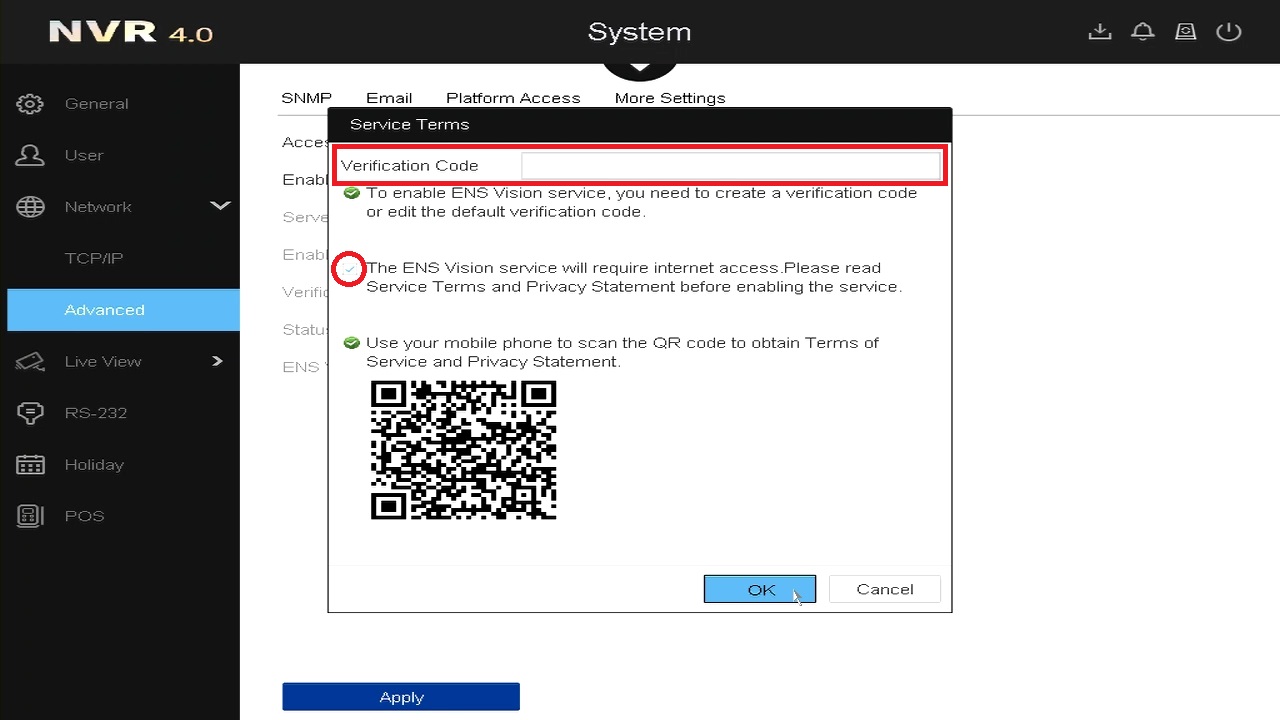
Once agreeing to the terms, you will be taken back to the Platform Access page. You will need to use the ENS Vision app to scan the QR code and register the recorder to a specific account. The account can be created on the ENS Vision app.

After scanning the QR code and registering the device to your ENS Vision account, the Status will show “Online” and ENS Vision Account will show “Linked”.
If you wish to delete or unbind the device to your or anyone’s mobile APP, click on “Unbind” button.

Then you will be taken to the page asked for permission, where you need to input the device password to confirm it.

Finally, double check the status of ENS Vision Account becomes “Unlinked”.

Related Articles
ENS Recorder || Prepping Recorder for ENS Vision || Web GUI
To access the web client, please use a Windows based PC and use Internet Explorer as the web browser. Access the recorder’s web interface by typing in the IP address on the address bar of Internet Explorer. The path should look like the following: ...ENS Recorder || Enabling Mobile Push Notifications || Local GUI
***Note: You will need to download the ENS Vision app from the phone’s respective app store.*** Please make sure the recorder is well connected to the Internet. And the status of the “Platform Access” shows Online and the ENS Vision Account linked to ...ENS Recorder || Backup onto USB || Local GUI
How to Backup footage to a USB drive on the ENS Recorder local GUI Starting on Live View in Full screen Right Click for the options box and click Menu. When there, click the Down Arrow to find and select Playback. In Playback select a camera or ...ENS IPC || Adding Doorbell (ES-HD2) to ENS Vision
ENS IPC || Adding Doorbell (ES-HD2) to ENS Vision Open ENS Vision and scan QR code Select Doorbell and [NDB322-W] then continue through setup wizard Setup doorbell with network onsite and let the doorbell connect Once adding is completed, enable the ...ENS Recorder || Firmware Updating a Recorder || Local GUI
Log into the system. Once logged in, move the mouse to the top center area and click the “arrow-like” button for the main menu access. After selecting the Menu, select the Maintenance tab. On the Maintenance menu, select the Upgrade tab. On the ...